Planetary Defences
As well as relying upon the intervention of interstellar warships, a planetary system may also be protected by local defences. The first of these are the high orbit defences, that are capable of attacking enemy ships as they approach the planet. These defence platforms are armed with ship weaponry, such as gun batteries and torpedo launchers, providing a solid ring of protection around the world. Larger installations can also be found, such as space stations and orbital docks which bristle with weaponry and attack craft launch bays. Most supreme of all are the six Blackstone Fortresses of the Gothic sector, with an immense battery of weapons capable of obliterating capital ships and cutting through whole squadrons of lighter vessels.
As well as stationary defences, many systems also use system defence vessels. Unlike larger warships, these ships have no warp engines and are therefore confined to the system. They are slow compared to the sleek frigates and destroyers of the Imperial Navy, but their guns are still potent enough to damage the largest enemy vessels.
Orbital defences or ships that count as defences may be placed in squadrons, with 1 HP fixed or mobile defences grouped in up to six units and larger defences grouped in up to four.
In addition to high orbit defences, a planet may also have a number of ground-based laser silos, missile batteries and airfields which can attack ships that enter low orbit, intent on bombarding the planet's surface or deploying troops for a planetary assault.
Stationary planetary defences may be placed in base contact if desired, but they can never be stacked or have their bases overlap other stationary planetary defences.
High Orbit Defences
High orbit defences may be placed around a planet or its moons. They must be deployed within the planet or moon's gravity well (ie, 10 cm for a small planet, 15cm for a medium one, etc.).
Low Orbit Defences
Low orbit defences may only be deployed on the low orbit table. They are all ground-based, so must be placed along the table edge which has been designated as representing the ground. Laser and missile silos have a front fire arc which faces away from the planet's surface and into space. Low orbit defences can never attack ships which are not on the low orbit table. It is particularly important to realise that ordnance launched from the ground cannot move up to high orbit - the fuel expended to achieve escape velocity means that the ordnance is rendered useless by the time it gets there.
Including Planetary Defences in Your Games
There are a number of ways to use planetary defences in Battlefleet Gothic:
Scenario driven
Some scenarios specify that the defender can spend a certain amount on planetary defences. In this case, the player with planetary defences chooses from the planetary defences list up to the points value indicated in the scenario.
Some larger planetary defences, such as space stations and Blackstone Fortresses, will probably only be used in very large battles or in specific scenarios you have designed for them. For example, you might like to re-fight one of Abaddon's attacks on the Blackstone Fortresses.
When desired, the defender in a scenario may spend up to one-third of his allocated point value on planetary defences, in addition to any planetary defences provided by the specific scenario. This allows for the use of larger planetary defences such as major fleet bases and the like, for which the profile and point cost of an Imperial Blackstone Fortress may be used. However, these additional defences come directly from the points allowed against his or her fleet list. This means trading off the mobility of ships for heavier planetary defences.
During standard games around a planet
As well as in special scenarios, you can also use the following method to play battles using planetary defences. If you generate a planet as a celestial phenomenon, you can also give it planetary defences if you wish. A small planet will have D6-2 orbital defences, a medium sized planet will have D6-1 planetary defences and a large planet D6 planetary defences. If the scenario has an attacker and a defender, then the defender is assumed to have control of the planet (although you could switch this to fight defensive battles in an enemy-held system). If there is no attacker and defender, both players roll a dice to see who controls the planet. Each planetary defence can be worth up to D6x5 points - roll each one separately. You may combine the points of several planetary defences to buy a single, more expensive defence system. For example, if you have a defence worth 40 points, one worth 15 points and another worth 35 points, you can combine them to buy an orbital dock (90 points).
Alternatively, you can decide beforehand that you'll be fighting near to a planet, in which case the defending player may buy planetary defences out of their normal points value - a small planet can have no more than 4 planetary defences, a medium planet can have a maximum of 5 planetary defences and a large planet a maximum of 6. It is also a good idea to put an upper limit on the amount of points that can be spent (for example, in a standard battle perhaps no more than 10% of the fleet's points may be spent on planetary defences).
Bear in mind that medium sized planets are more likely to be inhabitable than small or large planets and that the vast majority of planets in the Gothic Sector are uninhabited. You could include planetary defences in your normal games for added variety, but it's not something you should feel compelled to do every time you stick a planet on the tabletop!
In a campaign
If you are playing a campaign and you know which system type (eg, hive, agri-world, etc.) you are fighting in, you can use the following table to decide the level of planetary defences. Remember, not all the battles in a system will take place around the primary world - there may be a different type of inhabited world, or the two fleets might be fighting around an uninhabited planet.
You can also use the table to generate a random planet type during a non-campaign game - roll 2D6 and see what type of planet you' re fighting around. In this case, the number of planetary defences are determined by the planet's type rather than its size. However, they automatically pass any other leadership tests they may be required to make.
| 2D6 | PLANET TYPE | NUMBER OF DEFENCES |
|---|---|---|
| 2 | Forge world | D6+1 |
| 3 | Hive world | D6 |
| 4–5 | Civilised world | D6-1 |
| 6–7 | Uninhabited | D3-1 |
| 8–9 | Agri-world | D6-2 |
| 10–11 Mining world | D6-2 | |
| 12 | Penal colony | D6 |
Planetary Defences Leadership
Stationary defences and vessels used as planetary defences such as Defence Monitors or system ships do not roll for leadership or have a leadership value just as other normal planetary defences do not, with the exception that they reload ordnance (where applicable) on a nominal leadership of 7 unless specifically stated otherwise in their fleet lists or special rules.
This means that they cannot take on any special orders except Reload Ordnance, though they may also attempt to Brace For Impact against this same leadership.
They also make all other leadership checks they may have to make against Ld 7, such as for navigating celestial phenomena and for ignoring closest targets.
Ships that are targeted as defences but otherwise are not normally restricted to planetary defences, such as Ork Roks, Kroot Warspheres, etc., are treated as ships and can make Special Orders normally.
High Orbit Defences
| Orbital defence laser platform | 30 pts |
| Orbital torpedo launcher | 30 pts |
| Orbital weapons platform | 30 pts |
| Orbital mine | 5 pts |
| 0-2 Minefields | 40 pts |
| 0-6 Fire ships | 10 pts |
| System ship | 20 pts |
| Defence monitor | 60 pts |
| Orbital dock | 90 pts |
| Space station | 150 pts |
| Blackstone fortress | 400 pts |
Low Orbit Defences
| 0-8 Defence laser silos | 15 pts |
| 0-8 Missile silos | 5 pts |
| 0-4 Air bases | 20 pts |
Ramilies Class Star Fort
Quadrants
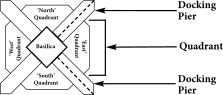
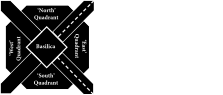
The Ramilies star fort is so large that its weapons, hits and defences are divided up into four ‘quadrants’ representing the different sides of the space station. When the star fort is fired upon, determine which quadrant the firing will hit by tracing a straight line from the stem of the firing ship to the centre of the fort. Likewise, when ordnance hits it will be resolved against the quadrant of the fort it moves in from.
Templates
Nova cannons and Armageddon guns can score a ‘full on’ D6 hits only against the quadrant most under the centre hole of the marker when it hits.
Damage & Criticals
All damage and criticals only affect the quadrant that they are inflicted against unless specifically noted otherwise. Quadrants are crippled individually once they are reduced to 6 Damage Points. Once a quadrant’s hits are reduced to 0 any further hits plow into the drifting wreckage and do no further damage, treat that quadrant of the base as an asteroid field from now on. This effect cannot damage the other quadrants and remains unchanged if the owning player elected that it rotate at the start of the game.
Ramming
When ramming the Ramilies, you can only ram the quadrant you first contact. If a ship happens to make contact right at the junction between two quadrants (as measured by the model’s base, not the model itself!), the ramming player may pick one of the two adjacent quadrants to ram.
Hit-and-run Raiders
Hit and run raids are likewise resolved only against the quadrant they are directed at and will not affect other quadrants.
Boarding
The Ramilies cannot be boarded by ships. Whole regiments would be needed. The only vessel that may attempt to board a Ramilies is a space hulk, as only a space hulk has sufficient numbers of troops.
If it does so, the remaining hit points of all four quadrants apply to the Ramilies’ boarding value, but only the turret value of the quadrant actually being boarded is added to this value.
Resulting hits and critical damage are only applied to the quadrant that was actually affected by the boarding action.
The Ramilies can always board any enemy ships in base contact in the end phase of its own turn, and it can decide how many quadrants are involved in the boarding action.
Damage Control
Damage control is also undertaken individually. To all intents and purposes the four quadrants function as individual stations placed ‘back to back’. The fort itself is only destroyed once all four quadrants are reduced to 0 Damage Points, and you should then roll on the catastrophic damage table for the Ramilies.
Massing turrets
The various quadrants of a Ramilies Star Fort automatically count as massing turrets (unless crippled or destroyed, following all normal rules for massing turrets). However, only the quadrants adjacent to it can mass turrets with a given quadrant, giving it a maximum of +2 turrets. This is in addition to any ships that may be in base contact, though the maximum restriction of no more than +3 turrets still applies.
Rotating
Before the game starts, the owning player can decide if the Ramilies will rotate or not. Once the decision is made, it cannot be changed throughout the game. If it is decided that it will rotate, it does so for 45° once per game turn (no more or less) at the beginning of the owning players movement phase. If it rotates, it will always rotate in the same direction. The Ramilies otherwise does not move in any way during the course of the game, it still counts as defences, and this movement does not alter nor can it be altered by any command checks or special orders the Ramilies can make. If the owning player decides the Ramilies Star Fort will rotate, then it cannot have ships dock with it for the duration of the game. Blast markers not removed remain in place when the Ramilies rotates and affect whatever quadrant they are in contact with at the end of its movement.
Ordnance
A Ramilies Star Fort may have in play up to twice the attack craft markers as the number of launch bays it has remaining.
Shields & Blast Markers
Each quadrant has its own shields; when blast markers are placed put them in contact with the appropriate edge of the fort’s base. Although the four quadrants are essentially in contact with each other, blast markers are only placed between the quadrant taking fire and the quadrant closest in the line of fire to that taking fire. In other words, a single round of shooting form a ship or squadron cannot place blast markers in base contact with more than one other quadrant besides the quadrant it is shooting at (for two in total) Quadrants not so affected count as not having blast markers in base contact, even if blast markers are in base contact with the model itself.
In the End Phase D6 blast markers are removed from the whole of the Ramilies fort, not per quadrant.
Docking
Friendly ships in contact with the Ramilies model can halt their movement just as if they were in a gravity well. If they wish to turn they may use Burn Retros special orders without taking a Command check to do so.
If a ship is in contact with one of the four inter-quadrant docking piers it can fully dock. While fully docked, it gains an extra four dice when rolling for damage control and if it remains docked for two full turns and was not braced, it is considered to have automatically reloaded ordnance (no Command Check required).
Even while fully docked the ship can still be targeted and attacked separately to the fort, although it counts as being in close formation with the fort for massed turret fire with the benefits and dangers that brings.
Special Orders
Unlike most defences, the command control and communications of the Ramilies is superior to even that of a warship. To represent this a Ramilies can use the following combat orders:
Ramilies are also typically manned by experienced personnel, so their Leadership is rolled as for a capital ship. A Ramilies also has a single command check re-roll which may be used when it attempts to roll special orders. Fleet Commanders may be placed aboard a Ramilies, in which case their own Leadership value is used by the fort and the fort’s re-roll is added to the commander’s own re-rolls so that it can be used throughout the fleet.
Split Orders
The internal communications of the Ramilies mean that its different quadrants can use different squadrons can use different special orders. For the purposes of issuing special orders to the Ramilies the owning player can effectively divide the quadrants up into squadrons and then issue special orders to each in turn.
For example, the player wishes to issue Reload Ordnance orders to the north and east quadrants, while Locking On with the south and west. Only two Command checks are made for the two pairs of orders. If later in the turn the player needed to Brace for Impact he could do so with a single quadrant only, leaving the rest free to reload or lock on again next turn.
Weapons mounted on the central Basilica count as operating under the special orders of all of the quadrants, so it entirely possible for them to be locked on, reloading and braced all at the same time. Brace for Impact orders will halve the firepower and ordnance strength of the Basilica weapons as normal.
The Fort in Campaigns
In a campaign a Ramilies can only be gained by a commander of eleven or more renown by making a dedicated appeal needing a 5+ to succeed. Alternatively the commander may surrender control of one forge world or hive planet and be granted a Ramilies by way of replacement. A Ramilies generates repair points equivalent to a pirate base and players can attempt to attack it in the same way as a pirate base. In addition to generating repair points the Ramilies enables one capital ships or escort squadron withdrawn for full repairs to return before the start of the players next game on a D6 roll of 4+.
If a Ramilies is found it can be moved to try and prevent further attacks on it. If the owning player decides to move his fort he must roll a D6. On a roll of 1 the fort is lost in the Warp and must be struck from the roster. On a 2 or more the fort relocates successfully and must be found again before it can be attacked. A Ramilies can earn ship and weapon refits (NOT engine refits – re-roll this result!) over the course of a campaign, and any refits earned apply to all quadrants.
Special Torpedo Refits
A Ramilies can purchase special torpedoes. However, if the Basilica takes critical damage while armed with torpedoes affected by critical damage (such as vortex torpedoes), BOTH critical damage effects from the table and from the torpedo special rules apply. Resulting additional hits from damage caused by the torpedoes can be distributed among the Ramilies quadrants as decided by the enemy player.
Critical Hits
Some of the larger defensive platforms like space stations and the Ramilies have multiple hits. When it comes to taking damage, defences with multiple hits work just like capital ships. They can suffer criticals just like capital ships and get crippled once they have lost half of their Damage Points. Remember that critical hits against the Ramilies only affect the quadrant they are scored against unless the result specifically states otherwise. The Ramilies class star fort uses the special critical hits table opposite.
Catastrophic Damage
Once all four quadrants of the Ramilies are reduced to 0 Damage Points roll a D6 to see what happens to the vast wreck.
Ramilies Class Star Fort Critical Hits Table
| 2D6 Roll | Extra Damage | Result |
|---|---|---|
| 2–3 | +0 | Lances damaged: The quadrant’s lance array is taken off line by the hit. The quadrant’s lance armament may not fire until it has been repaired. |
| 4 | +0 | Main armament damaged: Heavy damage silences some of the quadrant’s weapon batteries. They fire at half strength until it has been repaired. |
| 5 | +0 | Ordnance Bays hit: The quadrant’s ordnance bays are ravaged by explosions. No ordnance may be fired by the quadrant until the bays have been repaired. |
| 6 | +1 | Reactors damaged: The hyper plasmatic reactors are damaged, shutting down the power grid to the defences. Until the damage is repaired the quadrant’s shields and turrets are at half strength. |
| 7 | +0 | Fire! Oxygen lines are broken, leading to fires in many compartments. Roll to repair (extinguish) the fire in the End phase, if the fire is not put out it causes 1 point of extra damage and keeps burning. |
| 8 | +D3 | Hull breach: A huge gash is torn in the quadrant’s hull, causing carnage among the crew. |
| 9 | +0 | Command Tower Struck: A command tower on the central basilica is torn away. The Ramilies’ Leadership value is reduced by -2 points. This damage may not be repaired. |
| 10 | +0 | Shields Collapse: The shield generators overload and burn out, leaving the quadrant’s virtually defenceless. The quadrant’s shield strength is reduced to 0. This damage may not be repaired. |
| 11 | +D3 | Basilica penetrated! The main basilica is struck, causing immense destruction as the torpedoes stored there explode and wreak havoc. All quadrants suffer D3 damage and the Basilica weapons are lost. |
| 12 | +D6 | Reactor Struck! The central plasma reactor at the heart of Ramilies is struck, all four quadrants suffer an extra D6 hits from the resulting power surges and leaking plasma. Roll another critical damage result immediately and apply that to the quadrant struck. |
Ramilies Class Star Fort Catastrophic Damage Table
| D6 Roll | Extra Blast Markers | Result |
|---|---|---|
| 1–2 | 0 | Wrecked: The main structure of the stations survives somehow with parts intact and even some pockets of atmosphere. Venting gases and wreckage block line of fire across the wrecked fort, treat any movement through it as moving through an asteroid field. |
| 3 | 0 | Structural Collapse: The area is filled with huge chunks of wreckage as the fort comes apart. Place a 15 cm diameter asteroid field where it was. |
| 4–5 | 2D6 | Hyper-plasma Meltdown: The sophisticated reactor of the Ramilies goes critical in spectacular style. Resolve eight lance shots at every ship within 4D6 cm. All ordnance within that distance is removed. All other ships, defences and ordnance markers on the table suffer the effects of a solar flare centred on the fort. Finally the fort itself is replaced by 2D6 blast markers. |
| 6 | 0 | Warpbubble Implosion: The Ramilies is drawn into the Warp by an instantaneous collapse of its warp bubble generator. Resolve four lance shots at every ship and ordnance marker within 4D6 cm. Then replace the Ramilies with a Warp Rift . All ordnance and ships on the table top are then immediately drawn 15 cm towards the Rift and, if moved into it, will be affected as noted in the Celestial Phenomena rules. |
Orbital Mine
An orbital mine is a piece of heavy ordnance placed to protect a location such as a planet, moon or space station. With its own small engine it will home in on any energy signature it detects which is not accompanied by a friendly beacon signal. At close range it detonates a powerful warhead, which can cripple even the largest vessel.
Special Rules
- The orbital mine moves 10 cm towards the nearest enemy ship in each ordnance phase.
- If it moves into contact with the base of an enemy ship it detonates and rolls eight dice to hit the target vessel. The target vessel may fire its turrets normally. If the mine is hit it rolls four Attack dice instead of eight. Shields protect against hits from mines normally.
- An orbital mine is treated like any other ordnance for the purposes of movement, Blast markers and shooting. Except for fighters, mines are not affected by, and do not affect, any other Ordnance markers they come into contact with. If the mine comes into contact with fighters, both markers are removed as normal. Friendly attack craft (including fighters) will not attack activated mines.
- Once mines are in play, they are always active until destroyed. This includes individual mines purchased separately, from a minefield, as well as mines launched from modified carriers.
- Individual mines purchased separately count for victory points when destroyed, regardless of how they are removed from play.
Minefield
As well as solitary mines, some systems are protected by minefields covering several thousand kilometres. If an enemy approaches too close, the motion-tracking surveyors may detect the intruder and activate several of the mines to seek out the target and detonate.
Special Rules
- A minefield covers an area that is D3×5 cm by D3×5 cm and must be placed with an edge within 15 cm of a tabletop feature (such as a planet, moon or asteroid field).
- A minefield will block line of sight through it. Toward friendly ships, a minefield behaves as an asteroid field in all respects, and they may traverse a minefield as they would an asteroid field normally. Foolhardy enemy vessels may attempt to do so using a leadership check as when traversing an asteroid field.
- In the owning players ordnance phase, roll a dice for each enemy ship within 30 cm of the edge of the minefield. On a roll of a 5 or 6 the ship has been detected. Add +1 to the roll if the ship is on All Ahead Full orders and deduct -1 if it is on Burn Retros orders, also subtract -1 if the ship is an Escort. For each ship detected, the player may place one orbital mine anywhere in contact with the edge of the minefield. Once in play, orbital mines follow the rules above. Enemy ships inside a minefield will affect activating mines just as if they were outside the minefield normally, in which case they would be the first ship(s) targeted by any activated mines. If multiple enemy vessels enter a minefield and activate mines, the player owning the minefield determines which vessels activated mines attack first.
- Attack craft are not large enough to activate mines and can hide in a minefield the same way they may do so in an asteroid field (destroyed on a D6 roll of 6).
- Torpedoes that contact a minefield are destroyed.
- It is possible to suppress a minefield with firing, using gun decks and lances to create a swirl of gas and debris to blind the field's motion trackers. When shooting at minefields, treat them as ordnance for purposes of target priority. A minefield may be fired at like an Ordnance marker and has an armour value of 6. Each hit scored allows you to place one Blast marker in contact with the minefield. If a minefield has Blast markers in contact with it, deduct -1 from any dice rolls to detect ships. In each end phase, each minefield will lose D6 Blast markers and these do not count towards the number of other Blast markers that can be removed that turn.
- Individual mines deployed from a minefield do not normally count for victory points when destroyed.